Bike Carb Conversion Guide
Written on May 23rd , 2022 by Joshua Domingo
Carburetors why? Because VRRRRRRRRRRRrrrr.
The Conversion Roadmap
We can break the conversion into these major steps:
- Introduction and Parts List
- Drafting
- Remove the current fuel injection system
- Adapt the fuel inlet and return, replace or install a pump, filters, and gauges to carbs
- Install the new system
- Hook up parts of the old system
- Testing! Checks before the first start.
- Install throttle cable
- First drive to the gas station
- Tuning sessions
- Final adjustments
- Troubleshooting
Ideally, this is how the project build would go. Pretty simple! But, this is a project car. You will break stuff. You will find other parts that need repairs. You will remember that you wanted to buy a new door handle because it says, Porsche. But if it all does happen as smoothly as possible, wonderful. But let’s not get our hopes up. Let’s begin with planning.
Introduction: Carbs are wonderfully imperfect
A bike carb conversion is not very common and doesn’t seem to get too much good coverage. So why would you do it? I can only really think of two reasons why you should even go through with this:
- As a proof-of-concept on a shitty car you don’t care about
- Another way to revive your car’s failing fuel system
The main benefit that comes from a carb conversion is that you basically have ITBS. Carburetors are mechanical devices, so you got both the pros and cons of analog devices. For one thing, they are simple and that’s great for someone who wants to start doing some tinkering on their own. But as simple as they are, it also means you have to be able to adjust every single detail of the carburetor to perform at its best. Starting on carbs is easy, but fine tuning is hard.
For this conversion to go well, there will be many failures, and finding the right solution to those failures will take more than what this guide can provide. The principles behind the setup are like any other internal combustion engine, provide air and fuel at the correct ratio to combust. The big problem with this swap is it’s not exactly the most popular swap in the world. This isn’t engine swap complexity, but it can get close if you are building your own air/fuel system. So, as someone that has done a bike carburetor swap, don’t do this swap LOL.
Stick with your current fuel system and only do a carburetor swap as your last resort. I would use any mainstream carburetor setup such as Holleys or Webers, or any other reputable DCOE carbs just because of serviceability and it’s tried and true. There are no specific positives that warrant a bike swap as your primary option, honestly.
But are there any advantages to doing it? If you’re not fast, you better sound good and bike carbs don’t disappoint.
And there weren’t many options to get a used set of DCOE carbs when I first started this project! I sometimes have a hard time finding parts for this car, and the accompanying intake manifold for a DCOE setup wasn’t readily available at the time. But the main reason: it looked like a pretty fun challenge! I guess I’m a masochist for problems.
There was a lot of diagnosis, learning, time, money, and patience that went into this conversion. Since this is my first project car, I decided to go with this route to learn how to modify a low-power, fun car. Gaining experience with basic systems and tools will prepare me for future projects to improve my diagnostic analysis and simply make better projects. In the future, I’d transition over to an FI/ECU setup or maybe ITBs. I’ll tell you this, I learned so much about how fueling works for a car than I would have ever thought and I do not regret anything with this conversion.
Parts and materials for a bike carb
Here is a list of parts I can remember using. The number of combinations and solutions to the odds and ends of this project is limitless. Thus, use this as a guide instead of an end-all, be-all because you’re definitely going to need more than what I have here.
Essential parts
- 4-barrel bike carburetors
- Custom intake manifold with accompanying gaskets and fasteners
- Fuel line kit for fuel IN, 5/16” in my case for a Volkswagen Golf Mk1
- Fuel line kit for fuel RETURN
- Fuel filter
- Fuel and vapor separator
- Fuel pump, specific to the carburetors OR
- Fuel pressure regulator
- Carburetor air intake hose
- Carburetor vacuum lines and fittings
Plumbing parts
- Hose clamps for air (vacuum and intake)
- Hose clamps for fuel (fuel)
- Hold-down clamps for fuel hose
- Hose plugs and caps for testing
Carburetor parts
- Stock, factory pilot, main, needle jet parts
- Larger jets (pilot and main) for modifications to setup
- Longer adjustable idle mixture screw
- Spare fuel bowl gaskets
- Spare float bowl parts (hinge, level, screw)
- Throttle cable kit
Heat, Fuel, and Engine Management (optional, but highly recommended)
- Heat shields
- Fuel heat sheathe
- Fuel pressure gauge
- Air fuel ratio gauge
- Carburetor synchronizer
Recommended tools
- Respirator for vapor and particulate matter
- Safety glasses
- Fire extinguisher
- Basic hand tools (screwdrivers, sockets, wrenches)
- Allen keys
- Long Phillip head screwdriver
- Long flat head screwdriver
- Digital or dial calipers
- Smoke/leak detection system
- Vacuum tester
- Timing light
- Various picks
- Various pipe cleaners and other cleaning supplies
- Various Allen head fasteners, wrenches, and other spare hardware
- Throttle cable cutters
- Wire strippers
- Wire crimps
- Wire crimp connectors
- 18AWG and 12AWG wire kits, 3 or 4 colors would be good enough
- Voltmeter
- Hose cutters or new, sharp, blades
- Zip ties and other quick solutions
Fine tuning
You may need to buy or borrow other carburetor and tuning specific tools like:
- A vacuum-mercury gauge
- AFR gauge
- CO2 gauge
- Fuel pressure gauge get a good one, like from Aeromotive Inc.
- Smoke tester
You need to think about this fuel system change like an undocumented engine swap. There are probably a handful of people in the world that have done the same setup and goals. The more common your car, the more common the setup, and the easier it will be.
Other builds may have a different camshaft, exhaust, or carburetor. I cannot cover every iteration of carbs, chassis, and other bolt-ons. Use this guide as a base and build your car from there. You will have to do all of the tuning, carburetor jetting, vacuum adjustments, heat management, plumbing, and electrical work. Many shops won’t be willing to take on this work because it’s very custom and very tedious for not a lot of gain. If you have a shop that can do it, again, I strongly recommend you think twice about this. Once you remove the manufacturer’s original design, you ruin the balance of drivability, power, and reliability.
Specific to the Volkswagen Golf MK1/A1 chassis, there is A TON of information out there on carb conversions, either with tradiational DCOE carburetors or bike carburetors. However, most of it is scattered here and there without much cohesion. I intend to write a more definitive one on bike carburetors. Consider repairing their current system over replacing it because it can get overwhelming (and expensive) if you aren’t sure what you’re doing. But if you’re foolish enough to go through with a bike carb conversion like me, welcome!
0. Drafting
Drafting your design before making any changes is not manadatory, but you’ll kick your ass more than once for not having the foresight to miss plumbing in an extra vacuum line or mispump.
Look at your current fuel system, vacuum, electrical, and mechanical components that will be removed or modified. Research your car’s systems and find a diagram to minimize the number of surprise trips to the parts store. Draw each system separately on a sheet of paper and go through it in person with your car. If you are adding electrical systems, be mindful of the correct fuses and possible relays you want to run. Finally, any mechanical connections such as your throttle cable, spring adjustments on the carbs, fuel line routing, wire sheathing, heatshields, mounts, cables, brackets, etc.
Planning will get you 80% there with your final configuration, but you will obviously have to adjust for what is actually in front of you.
1. Remove the current fuel injection system
Removing the current system is pretty straightforward, but don’t go ripping out every single component. We’ll look at the process I went through with the Golf.
Let’s start from the rear, the fuel tank, and you can assess what you need and don’t need.
The internal fuel pump. This pulls up the fuel from the tank through a strainer and provides it to our external fuel pump. In the original design of the Golf, two fuel pumps exist the in-tank one and the pressurized one outside of the tank. I removed the pressurized one outside and replaced that with the bike fuel pump, this pumps at about PSI 3-7PSI versus the factory 43.5PSI. I kept the fuel line that goes to the engine, but currently do not have a return line. At the time, I was not sure what to do with the fuel return, so I just capped it off and both ends, keeping it there just in case for the future to add a fuel return to resolve heat soak issues.
Components I removed:
- Fuel filter before CIS fuel distributor
- CIS Fuel distributor
- All 5 fuel lines to each cylinder inject (1-4) and cold start injector (5) on the fuel distributor
- Intake manifold with throttle body
- Idle components
- Disconnect wire from Warm Up Regulator (WUR)
- Disconnect wire to frequency valve
- Vacuum hoses connecting to brake booster, valve cover, distributor, and intake
- Fuel in and fuel out lines
You may have more or less components than my setup.
2. Modify the fuel delivery system
Starting from the tank, be positive you have a clean tank! We want to check the in-tank fuel pump, float, and hoses are okay. If you’re positive it’s fine, move on.
The In-Tank Fuel Pump
I checked my fuel tank to see if there was any debris in it… and there was a bit, but not too much that I’d be concerned with. What we really want to do is make sure that NONE of that debris makes it to our fuel pump. I made that mistake by forgetting to put the strainer on my fuel pump, not too long after that the fuel pump was no longer a pump. With debris lodged in the pump, I lost fuel pressure and got a major headache trying to resolve the issue, ignoring the part that I just replaced.
Your in-tank fuel pump is comprised of two components: a fuel pump, which can be considered a transfer pump, and a fuel sending unit. A transfer pump transfers fuel from the tank to the next destination.
The fuel sending unit sends a certain voltage depending on the level of the fuel. When there is a lot of fuel, the float will float higher in the fuel tank, changing its arm position to send an electric signal saying fuel is high. When there is little fuel, the float will float lower, shifting its arm position to send a weaker electrical signal saying that fuel is low.
Confirm that all of these parts work normally, tighten your hose clamps and move on.
Main Fuel Pump
If you follow the feed line out of the fuel tank, you will get to the car’s original fuel pump inlet. I replaced the original fuel pump with a low PSI fuel pump, up to 7 PSI, to simplify the fuel system design. At this point, do you want to replace all the rubber lines with new rubber or braided stainless steel?
Since I’m cheap, I went with 5/16” rubber lines. It fit most places and I didn’t need to use too many adapters for a different size. But here’s a quick comparison between rubber and braided steel lines:
| Rubber Lines | Braided Stainless Steel |
|---|---|
| Cheap | Expensive |
| Worse abrasion resistance | Better abrasion resistance |
| Secured with clamps | Secured with AN Fittings |
| Low PSI ratings (Carburetor) | High PSI ratings (Fuel Injection) |
| Easy install | Hard install, needs extra tools |
Other than the in-tank fuel pump, this is a low PSI application, about 3-6PSI, so it would be OK to use the rubber fuel line versus the stainless steel braided line. Secure your fuel lines.
Add a filter before the fuel pump, install the fuel pump, and fasten it to a bracket. Run the fuel lines and tighten all of your clamps. When you have the carburetors fitted to your engine, take your fuel in and route it where there will be the least amount of heat and add heat shielding where necessary. The reason for this is to minimize the chance of vapor lock in a deadhead setup. If you are running a return line, it further minimizes your risk of fire.
Fuel pressure regulator, bypass or deadhead
I recommend bypass because return lines will allow full flow through the tank, ensuring fresh fuel all the time. Will add more information later…
Engine bay: filter, gauge, and carburetors
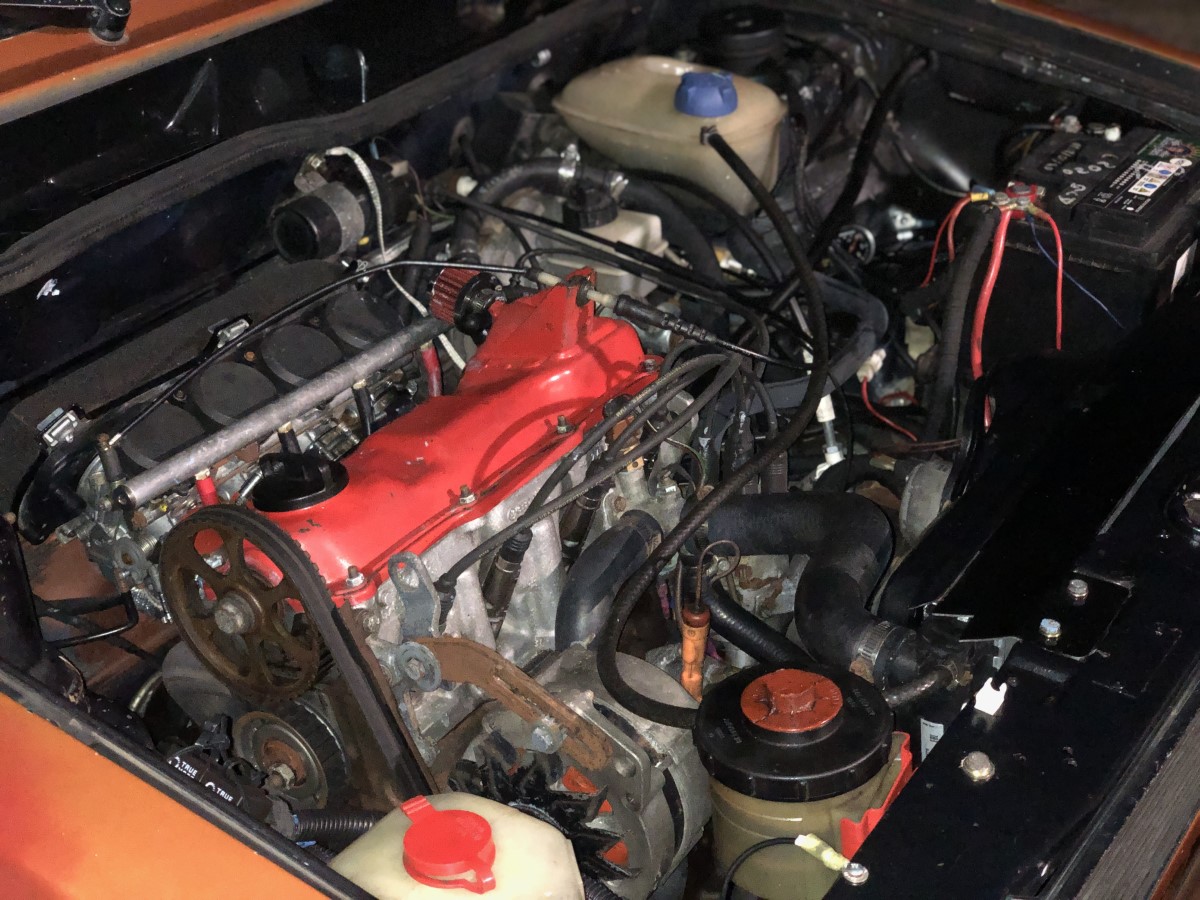
In the engine bay, find the fuel feed line which comes from our fuel pump we just installed. Add an in-line pressure gauge and the final line that leads to the fuel inlet for the carburetors. Be VERY mindful if any lines that are running near hot areas like the exhaust manifold, if so, sheathe the lines with heat protection to prevent heat soak or blowing up in a ball of flames from a leak. Connect to your carburetors.
If everything works as normal, congratulations, you assembled a fuel system! Not everyone can say that now can they? Well, let’s make sure this car will work, next up, are the air and vacuum systems.
3. Air and Vacuum
With your car’s original intake system gone, let’s draft up our system. Two options: DIY intake and premade.
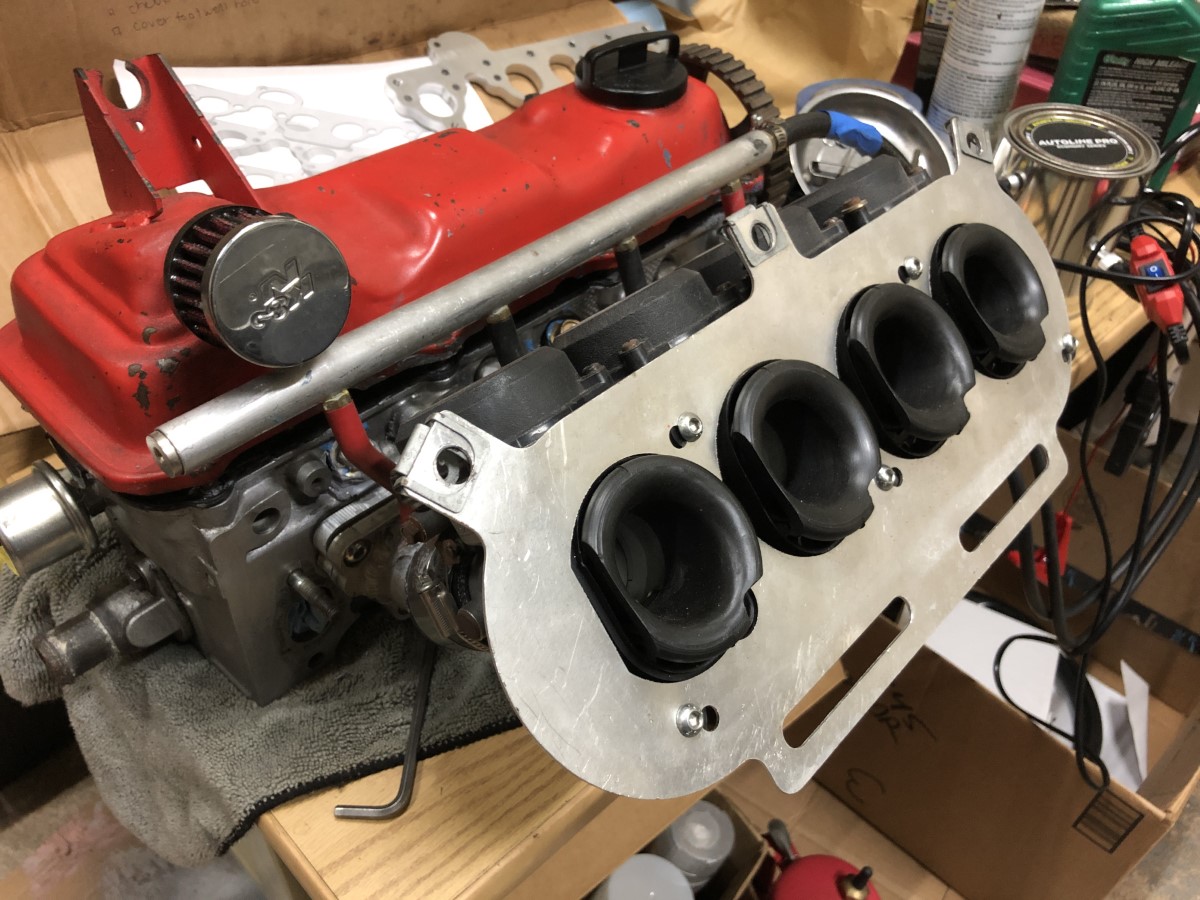
From the engine head, you will need to connect your carbs to those intake ports. You can either fabricate your own intake manifold or buy a premade one. I bought my manifold from danstengineering.com. But the process of making an intake manifold can go like this. Ideally, use metal, but some have made their intake/inlets out of high-temp plastic or composite.
Fabricate your own intake
Let’s start with the intake.
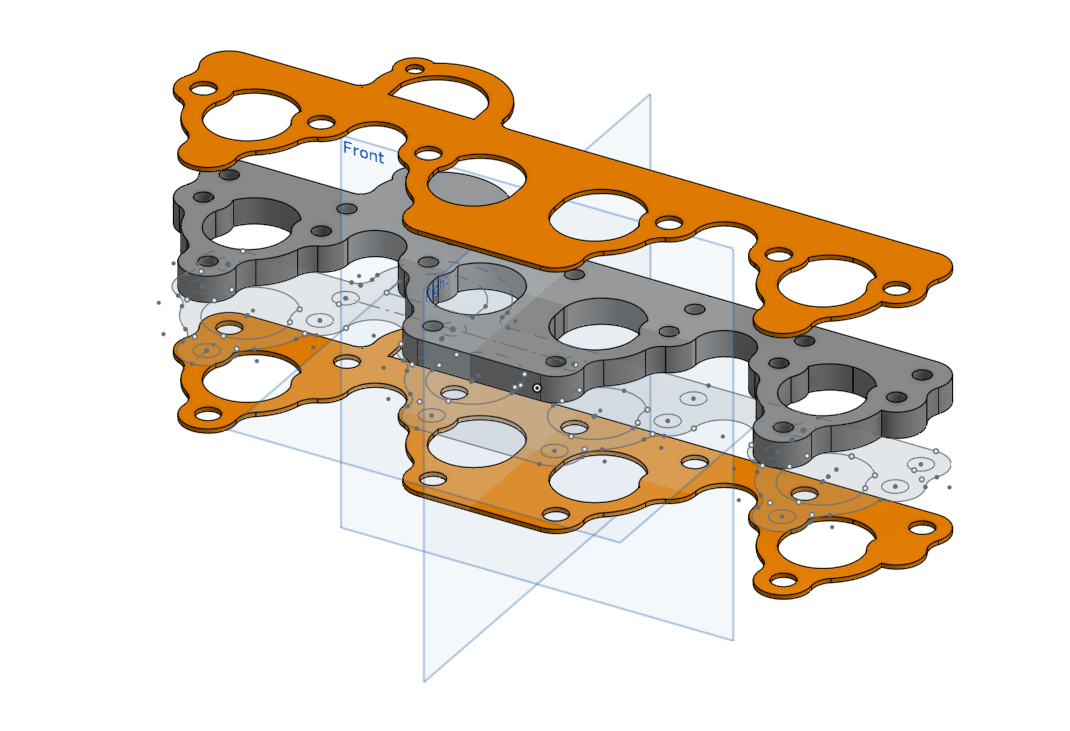
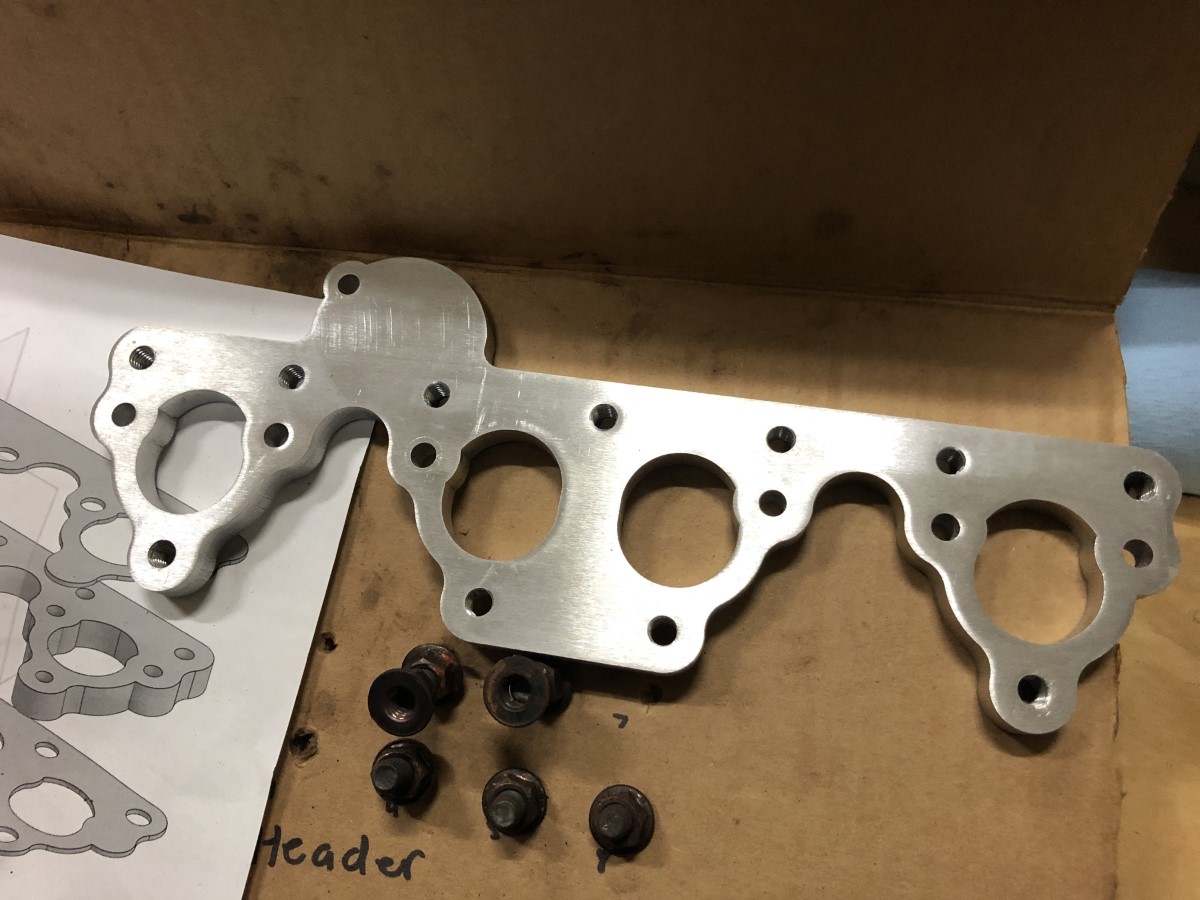
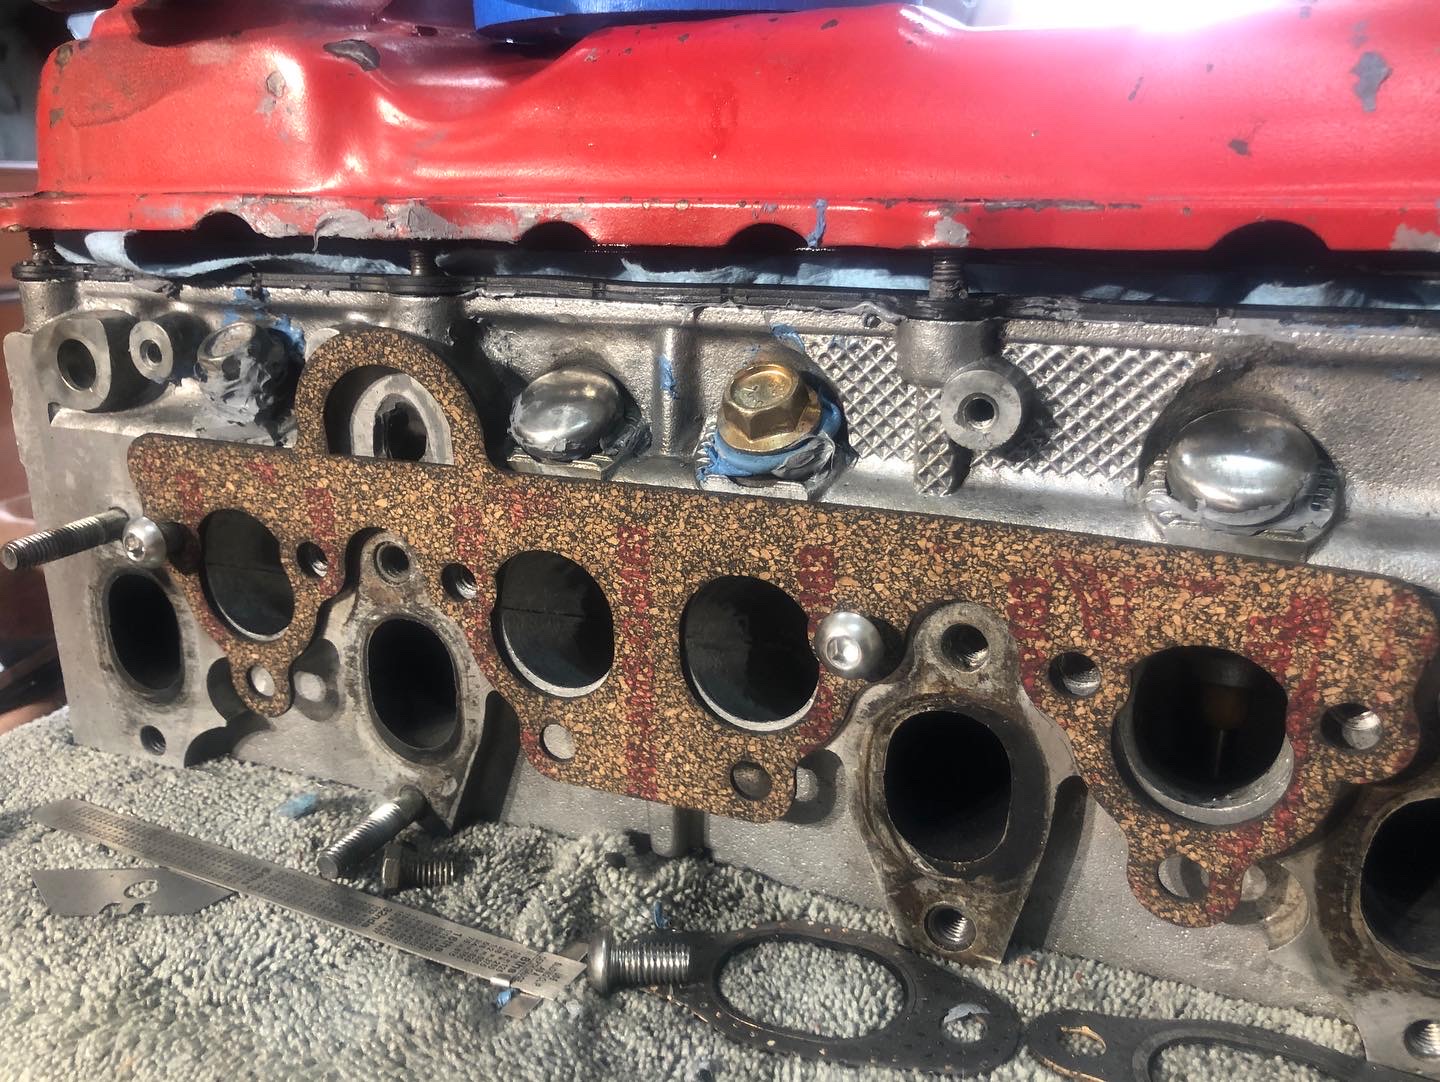
We need our carburetors to mate up to the intake side of our head as smooth as possible. To do that, we can replace the existing intake manifold, copy the mating surface, and create a new manifold with the same surface so you can bolt it to the head.
Start with removing the stock manifold to measure and draft the intake manifold’s mating surface. Confirm you have the correct measurements by looking at the existing intake manifold gasket. From here, you can take two routes:
- Make a one-piece flange where you can bolt it on to the intake manifold AND add pipes to connect our carbs directly
- Make a two-piece flange where one piece bolts to the head (pictured above), then another piece that will connect the carbs to our head flange. This adds to the number of gaskets and parts, but it can make servicing easier.
Personally, I’m not sure which design I would go with. I would have simplified and gone with the all-in-one piece, but the two-piece may be easier to service. It also means two times the fasteners and gaskets.
With the mating surface drafted, create your flanged surface and draft out how long your intake runners will be.
There is a science to the length of intake runners with airflow (CFM) calculations and finding the optimum length from the butterfly valve to the engine intake port, but I’m not covering that here. If you are going down this route, keep in mind your clearances, material thickness, and your engine’s CFMs. If you don’t really care for calculating the optimum length, just get some tubing and make sure it fits. After all, these aren’t going to be race engines, so I’m not concerned with peak performance. As far as intake angle, it seems negligent from what I’ve read on the forums, but I can’t touch on it further.
Connect the runners that start from the intake manifold and connects to the carburetor using fluoro-lined hoses. This special rubber hose is specifically made for fuel and can be quite pricey. My hoses are 45mm ID hoses which came with the kit. Optionally, you can include ports on the runners for vacuum. Adding ports from the four intake cylinders into one hose also allows you to connect it to the vacuum booster or other vacuum-based applications.
Material notes
For all of these parts, I’d recommend 5052 or 6061 aluminum, depending on your budget. For gaskets, repeat the CAD drawing of the mating surfaces and get those parts made of cork. You could do stainless steel, but it’s added weight and may rust quicker than aluminum. For the intake hose, stick with fluoro-lined hoses and for vacuum hoses, any silicone or rubber hose for vacuum will do. If you are doing a DIY build, buy extras, test, draft, and test again! If you think you’re saving money making it on your own, think again!
Keep in mind these components will be getting hot, I recommend using heat shields for body parts, rubber, or other sensitive parts and wire sheath to protect any wires.
Premade Kit

A premade kit with a manifold and carburetor set will resolve most of the engineering issues, all you have to do is install them! I can’t give specific notes here other than go through the installation slowly and understand the engineering design of it all.
AFR Gauge
An AFR Gauge or Air Fuel Ratio gauge will make this TREMENDOUSLY easier to diagnose. This will tell you if you have a rich or lean condition without needing to pop out your spark plugs.
Testing
This was the most challenging part of my whole build. I could not find a way to seal my vacuum leaks without spending a good chunk of money refinishing, surfacing, and making new parts.
Attach your carburetors to the engine head. Using T-bolt clamps will save you in the long run instead of the regular worm clamps. Worm clamps can work, but they aren’t perfect as you can risk biting into your hoses if you go too far. The ones I recommend are T-Bolt clamps, functioning just like a worm clamp but with the security of a spring clamp. Instead of biting from the torque point, the entire inner ring clamps onto the hose. Spring clamps are good clamps but can be hard to use if they are going to be in tight spaces and may have too much clamping force.

Use the T-bolt clamps at the most crucial point: the intake manifold. In all other areas, use worm or spring clamps to secure the vacuum and fuel lines. Some vacuum lines probably won’t need clamps if you’re using barbed fittings to join them.
Once the entire system is hooked up, we can almost start the car!
Remember all other parts of your vehicle that utilize vacuum, think of your charcoal emissions, distributor, vacuum-based systems like shift lights, brake booster, fuel pressure regulator and so on. There are many applications for the big air pump in your car we call the engine; therefore, the vacuum system needs to be completely sealed to be effective. Tracing a vacuum leak is quite difficult if you’re not sure what happened. By using a smoke tester, you can push smoke through your vacuum system enough to see where a leak might occur! The smoke should reach the intake side of the fuel system, and if there are no more leaks, then you are all sealed from there. The hard part is getting there!
4. Reinstall everything that isn’t your fuel system
This would mean anything that isn’t part of the CIS. Engine control module, spark plugs, battery, etc.
5. Testing! Checks before the first start.
To avoid damaging your engine you can temporarily disable the spark plugs by removing the center spark plug wire that goes to the distributor. At this moment, we do NOT want to fire the engine, we are checking for mechanical issues.
- Check timeing
- Prime your fuel pump, and fill the lines with fuel to get good pressure. Turn the car on and off to get fuel flowing through your fuel lines. Check for leaks.
- Smoke the vacuum system, and double-check your vacuum system to see if there are any leaks. Smoke should only come out of your carburetors. Check for leaks.
- Check your fuel pressure, be sure it’s the correct fuel pressure for your carbs. If it’s low, check your fuel filter and check for blockages or kinks in your hoses. If it’s too high, you may need a regulator.
If everything goes smooth from here, attempt to start the car. Wire up all your plugs, coil, and fuel lines, clean up the engine bay and attempt to start the car. If it starts, congrats! If it doesn’t start, scroll to the bottom to read my diagnostic procedure.
6. Install throttle cable
Check your throttle cable and other mechanical linkages. Pull your cable to make sure there is no binding across the throttle range. If you have a sticky throttle, you’ll have a bad day.
7. First start
If everything passed and you have no leaks, start the car.
FINALLY.
Driving your project car on the block is a validation that your car still works after making so many changes to the car. Start the car and let it warm up to give it the best chance of surviving your drive. Don’t forget about your brakes and lights, the vacuum system is connected to your brake booster right? It’s good that you have a working engine, but safety becomes more important after making these modifications. If everything checks out, roll out of your driveway and see if you can make it back. If you’re feeling brave, take it on a public road. And if you’re really brave, go to the drive-thru.
I went to the gas station for my first trip since I really needed to fill up some gas to sub out the old gas. Get a feel for the suspension, brakes, mobility, and throttle response. See how the car changed. You could be faster too! But I’d say that you sound faster than you look with motorcycle carburetors.
8. Tuning sessions
We have the car running and driving now, but we need to tune the car to reach our AFR targets. Carb heads will shine here, we’re tuning the carburetors for the best performance across the throttle range. Tune for reliability first. We need to establish a proper baseline for the car before going crazy. With all this talk about the baseline, how do you actually get there?
The process of tuning your carbs can go two ways: spark lug chops and AFR gauges. Of the two, I recommend buying an AFR gauge.
Spark plug chops - Old style
This is an aged, tried-and-true method, but it’s tedious and time consuming.
Checking your spark plugs every so often on a drive up and down the street gets old really quick when trying to tune your carbs. The process starts with fresh, clean spark plugs and a drivable car. Drive up and down the street for about 5-10 minutes and promptly after going for a drive, stop and kill the car, and immediately check your spark plugs. All of them. You need to inspect and compare each cylinder’s spark plugs and determine if the mixture is too lean, too rich, or just enough. After driving, you make some adjustments based on the results and then you start all over again. Drive. Stop. Check. Adjust. It’s a very tedious and time consuming task that most people do not have the time and patience for. However, it is not totally useless.
During an annual or semi-annual maintenance check with your car, you may pull the spark plugs to check engine health. This checkup is a supplementary indicator for you to see if the engine is too lean, too rich, or doing just fine. Refer to the spark plug chart below:
Checking spark plugs is a very tedious method of tuning but it is still something worth keeping in your back pocket during diagnosis! Use it to aid your findings, most people do not have the skill and expertise to simply use spark plugs to tune carburetors.
Air Fuel Ratio (AFR) Gauge - Do this one.
Tuning with technology.
A wideband AFR gauge is comprised of an O2 sensor and a gauge measuring small changes in voltage. The O2 sensor is different than your normal O2 sensor on factory cars. Factory sensors have a limited range of values they can measure. All it will say is if you’re at ~14.7 or not! The factory’s goal is to adhere to the 14.7 AFR as closely as possible throughout the RPM range for efficiency, power, and adherence to emissions. That is not the tuner’s goal. Wideband O2 sensors are able to measure and output values outside of the 14.7 AFR range. This is what we want to see and how we want to tune.
O2 sensors work like this: the car provides its energy (5V usually) to heat up its sensor. This sensor measures the oxygen levels wherever it is installed in your exhaust system. The sensor will produce a proportional amount of electrical output and that output is finally inputted to our gauge which will spew out some number that makes sense to us.
The drawback? Your AFR readings are NOT the end all answer to everything. The majority of the time it is very accurate, but somteimes you may get a misleading lean or rich mixture when in fact you have a vacuum leak! There is nothing wrong with your AFR, it’s your setup that has to be correct. If you are tuning on a vacuum leak or fuel pressure inadequacy, you will not be able to accurately tune. Confirm with a smoke test.
Refer to this chart of preferred AFR values. We want a range between 12.2 and 16.5 https://www.safrtool.com/SAFR-AFR-values.asp
| AFR | Description |
|---|---|
| 6 | Rich Burn Limit |
| 9 | Black smoke, low power |
| 11.5 | Best rich torque at wide open throttle (WOT) |
| 12.2 | Safe best power at wide open throttle |
| 13.3 | Lean best torque |
| 14.6 | Stoich mix |
| 15.5 | Lean cruise |
| 16.5 | Usual best economy |
| 18 | Carbureted lean burn limit |
| 22 | EEC/EFI Burn limit |
And these are the baseline targets at each throttle range:
| AFR | Goal |
|---|---|
| 13.5 | Idle, light cruise |
| 14 | Cruising |
| 12.5 | Wide open throttle |
| 12 | Acceleration |
Starting with tuning your idle. During idle, 14.7 would be great, it might be a little too lean for the car on a cold start resulting in longer starts. On a cold start, you will need to pump in more fuel by modulating the throttle. 13.5 will give you more leeway with the richer mixture.
Looking at cruising speed, we want around 14 which is a balance of average power and average efficiency. Cruising is anytime on the pedal to 30% throttle. While stoich would also be ideal here, we err on the side of more fuel to compensate for carburetors inefficiency to atomize fuel, compared to fuel injectors.
Next, wide Open Throttle or WOT is our next focus. Realistically we won’t be at WOT all the time, so tune to your preference. My WOT is currently at 14 and I am fine with that. For solid, max power at WOT, 12.5 will suffice. Finally, during acceleration, 12 AFR will provide us with the highest amount of torque and power.
My carb base settings
Carburetors will have a baseline setting from the factory for your float, idle adjustment screw, needle jet, and main jet. Search for them online and set your carb to these settings. If you bought your carbs used or came off a motorcycle, we can assume that it should retain the same jets, screw, and float settings. If you STILL can’t find any settings, just use the jets that are in there and hope that it can run in your car :)
There may be reliable ways of guessing and checking, but with a lot of time and inconvenience to learn about the fuel and air inputs of your specific carb, I would say slap the carbs on first and test.
- Pilot Jet: 38 jet at 3.5 turns out
- Main jet: Cylinders 1 & 4 (outer carbs) 160, cylinders 2 & 3 (inner carbs) 165
- Needle jet clip position: with the needle pointing down, third position. No shims.
Tuning Process
There are MANY tuning guides on carburetors online. Here is my brief guide. But, if you want more reading, I would suggest to read the Keihin Carb Jetting guide
With a cold engine, attempt to start the car with your foot on the gas pedal. On my car, I have to hold down the gas pedal to load up the carb with fuel for 5 seconds, then I gently feather the throttle based on how the car sounds. Observe the cold start time. Cold starts are leaner than your normal idle, but we want to know how lean. Record the AFR on startup to idle for cold start.
On a cold idle, record the AFR. As the car warms up, the car’s AFR will slowly richen up. Drive the car around if you can or just let the car warm up until the first fan cycle turns on and off. This is only for the first tuning session. Once you can drive the car, do that to warm up your car. If your fan isn’t turning out, confirm your thermostat, thermoswitch, or other warming switches for the fan are functioning.
Now at a warm idle, record the AFR. Increase your idle speed to about 1500-2000. This will allow you to check your idle/air mixture, we want around 14-14.7. We are going to be adjusting the IDLE screws, this can be air or fuel screws. To reiterate, we set these screws to factory settings. Now that we have it on the car, we will adjust it to suit our AFR. For fuel adjustment screws, if your car is lean, increase the amount of fuel. If your car is rich, decrease the amount of fuel.
For air adjustment screws, if your car is lean, decrease the amount of air. If your car is rich, increase the amount of air.
With the idle circuit done, we can move on to the needle jet, the second-most important circuit.
The needle jet circuit is where we will be cruising around the most, a little off idle to half throttle. To check this, keep your foot on the gas and modulate the pedal from the quarter to half position, and track your AFR. Our goal here is between 12 and 14. 12 on acceleration and 14 once it’s stable.
Last is the main jets, these are for WOT tuning so rip that goddamn project and observer the AFR. If it’s in the 13.5-14.0 range, you should be ok.
| Case | Expected AFR Result |
|---|---|
| Cold start, cranking | 15-16 |
| Cold start, idle | 15-16 |
| Warm idle | 14-14.7 |
| Cruising (0-30%) | 13.5-14.0 |
| Acceleration (31%-50%) | 12-13 |
| High acceleration (51%-70%) | 12-13 |
| WOT (71%-100%) | 12.5-13.5 |
The numbers WILL be different for everyone between elevation, jetting, and overall car health. Use your judgement on how it is running. Do your research on how tuning really works and you will come out, in due time, really damn good at tuning to be good enough. We’re not aiming for perfect yet, just good enough.
9. Final adjustments
The final step is to perfect your setup! Projects will never be “finished”, but there will be a point where you won’t be breaking down every other time you drive it. And that my friend is the time to celebrate. This is where you can truly enjoy your car with only minor maintenance issues.

Depending on how far of a modification you have gone, most likely, you made the car worse off in some ways, haha. This rings true across almost all aftermarket modifications. Reliability and drivability are dependent on your ability to engineer and solve mechanical issues.
In this stage you will want to resolve these things:
- Throttle cable position
- Ideal idle RPM
- Tuning for power or tuning for efficiency
- Reliable parts
- More heat management
Finding the optimal settings for fuel, air, vacuum, and heat in varying degrees of weather and performance is what you are trying to accomplish. Set targets for what you want to reach.
Do you want to improve performance? Improve torque, improve reliability, and improve maintainability. Start with a goal and work towards that single goal. If it’s too lofty, break it down to a smaller goal.
For example, I wanted to improve my idle mixture from 16 to 14.5-14.7 AFR.
- I’ll start by looking at my air system, do I have vacuum leaks, fuel leaks?
- I’ll check my fuel system and make sure it has the correct pressure and no visible leaks.
- Record my current settings for my AFR mixture
- If my AFR is 16 and I want to get to 14.5, I’ll go in steps
- Enrichen my mixture by 1/2 turn. Turn the car on and check.
- Blip the throttle, go for a short drive
- Repeat 5-7
This is my process of going through my whole car… and really is as tedious as it sounds.
10. Troubleshooting
Assumptions
You must be 200% that you confirmed all of your Ask yourself:
- Electrical issues? Is my car properly grounded? Is my battery charged? Is my alternator okay? Am I getting spark?
- Do I have air leaks?
- Do I have fuel leaks?
- Do I have compression?
- Is my engine timed properly?
With all diagnosis regarding engine running issues, consider the 5 major elements:
- Spark
- Air
- Fuel
- Compression
- Timing
I made a table of points to check off and if you can check off every item, then it’s time to take a closer look at the carburetor settings.
Is there a hissing noise when you use the starter?
- Check for vacuum leaks. The hissing could be the air coming in through a small hole or leak. This is known as unmetered air. While we do want more air for the engine to create more power, unmetered air is unaccounted for and will through your AFR out of balance. Let’s start the car on a good note.
Car starts, then die, then starts again?
- This could be because of several issues. Fueling, air leaks, alternator failing, cold engine, etc. You need to start broader and look at the five elements. Narrow down which system is failing then reference those issues as your new starting point.
Cranking, but takes a while to start the car?
- To cold start a carb engine, floor the gas pedal for 3-5 seconds on the first crank, this will get more fuel into the bowls to start the car. As the starter engages, the vacuum will suck up the air-fuel mixture, starting the car.
- Fuel pressure is too low. Make sure your fuel pump is working as intended. The pump should run for 3 seconds when turning on the car, this is also known as priming. If you don’t hear it, check your fuse, relay, and physical connections. Clogged fuel filters, bad gauges, and hose kinks may diminish your fuel pressure.
- Fuel flow is too low. While unlikely, make sure that the aftermarket fuel pump you chose is suitable to flow enough fuel for your car. Check out https://deatschwerks.com/pages/fuel-pump-calculator. For gasoline engines, take your horsepower (HP) and divide it by 0.6.
- Your AFR mixture is too lean. Your engine is cold and needs more fuel to start a combustion cycle. Let the car cool down then try to start the car with starter fluid. If it starts normally, let the car warm up, then adjust your AFR. This can also be because of a vacuum leak. Again check your hoses, vacuum advance, brake booster, etc.
After letting the car warm up, I turn off the car, but the engine violently spins over again before stopping completely!
-
This is called dieseling. Diesel engines work with heat and compression and do not use spark for ignition. When you turn off the car, there is leftover air and fuel in the combustion chambers, hence a short-term turnover until the engine depletes the leftover fuel. It’s not only dangerous and unhealthy for your engine, but it’s very annoying. On a normal system, if this is a naturally aspirated car you may have a vacuum leak and have a rich mixture.
-
Temporary solution:
I’m unfamiliar with high power systems such as turbocharged, supercharged, and blow-thru carb designs so I can’t help there :/
I can’t figure XXX out, what should I do?
Welcome to diagnostics and project cars!
If you’re still having trouble, take a couple days off! Honestly, you need a fresh pair of eyes if you’ve been staring at the same setup for 5 or 6 days straight, every day after work, exhausting yourself to wit’s end. I’ve been there and if you’re out there on your own, you aren’t alone. Everyone has a “tuning” issue, as broad as it is, but we’re all in the shitty money pit together!
Challenge your assumptions, challenge your answers. Every setup is different in this conversion and you are the most aware of what changes were made to the car. The problem can always be solved money, but we’re too broke to do that.
Other resources
- https://www.reddit.com/r/projectcar/comments/v635ph/d16_bike_carb_conversion_running_and_driving/
- https://www.jalopyjournal.com/forum/threads/ford%C2%92s-2-0-2-3-2-5-litre-engine-family-guide.317117/
- https://www.locostusa.com/forums/viewtopic.php?f=27&t=12008
Summary
Congratulations! You have truly modified your car and graduated from a simple bolt-on boy to a carbureted crook.
This is a lengthy process that is going to take more than buying the simple bolt-on parts to make this run well. This build is going to take a lot more dedication and attention to detail than you would imagine and hopefully when you reach the end, you will understand how your car is running.
Consequently, your ability to diagnose, engineer, and solve problems will grow. And by the end of it all, don’t forget to hoon the fuck out of your neighborhood with one of the most beautiful, visceral sounds of carburetors.
Your car may not be faster. Your car may not be strong. Your car may not even run at all!
But when your car is on the road, cruising along in the end, you can own up to this car. It’s something that you have modified and changed, for better or worse. Take pride in your work.